Guided Audio – Eye of the Storm Meditation

Guided Audio – Eye of the Storm Meditation

Eye of the Storm Guided Meditation

Life doesn’t slow. You have deadlines, emails, and messages. The stress creeps in before you notice. But in the middle of all this chaos, there is always a still point—a space of quiet within you that is beyond stress and confusion.

This quiet space is the eye of the storm—a place where we can pause, breathe, and reconnect with ourselves, no matter what is happening around us.

Take three minutes to find calm with this short meditation, where I guide you into that still center, the place of clarity and calm. You don’t need silence. You don’t need perfect conditions. You only need to pause and breathe.

I recorded a guided audio for you to practice the Eye of the Storm Meditatiom. The audio is about 3 minutes.

Eye of the Storm Meditation Practice tips

Wear headphones if possible.

If at any time during the meditation, you become physically uncomfortable, create some movement.  You can shift around in your seat or even get up and walk around.  

Don’t force your breath.  Let it flow normally,

If your mind is restless, you are not doing anything wrong.  

Relax and breathe.

Enjoy!

Short Yoga Practice – Warrior two and Triangle

Short Yoga Practice – Warrior two and Triangle

In this thirty-minute practice, I will lead you on a path to creating a warrior two pose appropriate for your practice.

Warrior two is an asymmetrical pose, meaning that it creates pelvic movement in opposing directions. If the hips are tight, or there is stiffness in the hips and pelvis from injury or aging, the wide-legged turn-out required in this pose may be difficult or painful. For the flexible yogis able to create this pose, there is compression within the front hip joint, which could damage the joint over time and repeated practice.

In this slow and steady practiced, I lead up to Warrior two after experiencing the joint movements needed to create this pose.

This practice does require the ability to get up and down from the mat and will require being on your knees.

I don’t know your body. Any cues I offer are suggestions. If you feel discomfort, dizziness, or lightheadedness, stop the practice.  This practice is meant to be an exploration done in a mindful, safe way. Yoga is the practice of awareness. It is choosing the right action in a moment, not one that will harm you.

This practice video is about 30 minutes long. You will need a yoga mat, two yoga blocks, and a blanket or towel. You may also wish to have a coach cushion or bolster. 

If you would like to learn more about Warrior two, I filmed a short video explaining how Warrior two may need to be expressed for normal human anatomy.

Yoga Pose Makeover – Warrior 2

Enjoy!

If you have questions or comments, please reach out to me [email protected]

Short Yoga Practice – Warrior One and Forward Folds

Short Yoga Practice – Warrior One and Forward Folds

In this thirty-minute practice, I will lead you on a path to creating a warrior two pose appropriate for your practice.

Warrior two is an asymmetrical pose, meaning that it creates pelvic movement in opposing directions. If the hips are tight, or there is stiffness in the hips and pelvis from injury or aging, the wide-legged turn-out required in this pose may be difficult or painful. For the flexible yogis able to create this pose, there is compression within the front hip joint, which could damage the joint over time and repeated practice.

In this slow and steady practiced, I lead up to Warrior two after experiencing the joint movements needed to create this pose.

This practice does require the ability to get up and down from the mat and will require being on your knees.

I don’t know your body. Any cues I offer are suggestions. If you feel discomfort, dizziness, or lightheadedness, stop the practice.  This practice is meant to be an exploration done in a mindful, safe way. Yoga is the practice of awareness. It is choosing the right action in a moment, not one that will harm you.

This practice video is about 30 minutes long. You will need a yoga mat, two yoga blocks, and a blanket or towel. You may also wish to have a coach cushion or bolster.
If you would like to learn more about Warrior two, I filmed a short video explaining how Warrior two may need to be expressed for normal human anatomy.

Yoga Pose Makeover – Warrior 2

Enjoy!

If you have questions or comments, please reach out to me [email protected]

Yoga and the Sacroiliac Joint

Yoga and the Sacroiliac Joint

In this musing, I discuss the sacroiliac (SI) joint. First, I will talk about what it is. Then, I’ll discuss how yoga poses can affect it and suggest ways to stabilize this joint during Yoga to avoid pain, discomfort, and injury.

What is the Sacroiliac (SI) joint?

The sacroiliac joint, or SI joint, is where the sacrum (your tailbone) joins the two halves of the ilium (the large bones of your pelvis). This joint transfers the weight of your upper body to your legs and vice versa. It also creates stability during movement.

The SI joint should be relatively immobile

Only a little movement is needed to absorb shock and distribute weight evenly through the body. The ligaments around the SI joint and the muscles of the lower back and hips that stabilize the pelvis also stabilize the SI joint.

The SI joint can become dysfunctional

SI joint dysfunction can occur when the joint becomes too mobile due to the weakening of the ligaments and muscles supporting it due to injury or aging.

What happens if the  SI joint becomes dysfunctional?

Sometimes, the SI joint locks in one position. In addition, there might be decreased range of movement and stiffness in the lower back, hips, or thighs. Activities like bending, lifting, or twisting may become challenging because of reduced mobility. Instability in this joint can make it difficult to maintain balance and increase the risk of falls.

What are the risks for SI joint dysfunction?

SI joint dysfunction may occur with degenerative spinal issues or previous back or hip injuries. In addition, during pregnancy, hormonal changes can cause the ligaments in the pelvis to loosen and stretch.

Hypermobility and the SI joint

Hypermobility, or the ability of joints to move beyond their normal range of motion, can create instability in the SI joint.

The SI joint typically has limited mobility due to the strong ligaments and muscles that stabilize it. However, in people with Hypermobility, the ligaments and muscles may be weaker and more easily stretched. This stretch allows the SI joint to move excessively, creating instability.

In addition, Hypermobility can affect other joints, further aggravating SI joint dysfunction. For example, Hypermobility in the hips or lumbar spine may cause the SI joint to bear more weight, leading to increased stress and dysfunction.

Yoga and SI Joint dysfunction – Problematic Poses

While Yoga is generally beneficial for building strength and flexibility, certain poses can stress the SI joint.

Next, I’ll explore common Yoga poses that can affect the SI joint and discuss how to modify them to protect the SI joint.

Both seated and standing folds may aggravate SI joint issues. Forward folds may stretch the hamstrings and lower back. When the legs are straight, the hamstrings pull the SI joint in one direction, and the weight of the spine moving forward pulls the SI joint in the opposite direction creating a shearing force. To modify forward folds, bend the knees slightly or place a block under the hands in standing folds to reduce the shearing. If seated, bend the knees, and sit higher on a block or folded blanket.


Learn more about ways to modify forward folds:

Yoga Realigned – Forward Folds

Yoga Pose Makeover – Forward Fold


Twists can also be problematic for individuals with SI joint dysfunction, particularly when twisting from the lower back. To avoid excessive strain on the joint, focus on turning from the upper back and shoulders instead. ​


Hip Openers generally require an external rotation of the hip joint. External rotation of the hips is when the inner thigh moves away from the body’s center. External rotation may put pressure on the SI joint. Hip openers include poses like butterfly (bound angle pose), pigeon, and cow face pose. To avoid aggravating SI joint dysfunction, focus on hip-opening poses that involve internal rotation, like a low lunge, or decrease the amount of external rotation by using props like blocks or blankets in seated hip openers.


Backbends can be challenging for individuals with SI joint dysfunction because they stress the lower back and SI joint. To modify these poses, use props like blocks or blankets to support the spine if you are on your back. Focus on placing more of the back bend into the thoracic spine (between the shoulder blades), not just in the low back.


Warrior I positions the front leg forward with a bent knee. The back leg reaches straight back on the mat. This pose causes an asymmetry of the pelvis. The front half of the pelvis rolls open, and the back half rolls inward. Warrior I can also cause compression in the SI joint due to the forward tilt of the pelvis. In addition, squaring the hips in Warrior One pose creates more asymmetrical rotation of the SI joint, causing strain and instability if the joint is already compromised.

Learn how to modify Warrior 1:

Yoga Pose Makeover – Warrior 1

Yoga Practices – Warrior 1 Realigned

Triangle yoga pose, places the legs straight and far apart, with the torso rotated to the long side of the mat. This pose stretches the muscles and ligaments surrounding the SI joint. Bending the front knee reduces the stretch, helping to alleviate pain and discomfort. Additionally, bending the front knee allows engagement of the muscles in the legs and core, providing stability to the SI joint.

Learn more about modifying Triangle pose:

Yoga Pose Makeover – Triangle Pose


How to Stabilize the SI joint during yoga practices

In addition to modifying poses, stabilizing the sacroiliac joint by engaging the legs and core is important to avoid exacerbating dysfunction or causing further injury by preventing excessive movement in the joint.

Here are some tips for stabilizing the SI joint during your practice:

Engage the Core

The core muscles stabilize the SI joint. These include the abdominals, pelvic floor, and back muscles. Focus on engaging these muscles creates a strong, stable base for your practice.

Know the proper alignment for the pose

Proper alignment creates stability in the SI joint during yoga poses. Alignment tips include:

  • Aligning the hips with the pelvis.
  • Engaging the core.
  • Avoiding excessive movement or rotation in the lower back.

Focus on maintaining a neutral spine and pelvis throughout your practice.

Use Props

Props like blocks, straps, and blankets reduce stress on the SI joint. For example, you can use a block or blanket under the hips in seated poses to relieve pressure on the SI joint.

Learn more about using props:

Yoga Props for your perfect practice

Yoga Props – Not Just for the Beginner

Avoid overstretching

Pushing beyond your limits in yoga poses can be tempting, but overstretching can stress the SI joint and lead to injury or dysfunction. Instead, focus on stretching gradually and mindfully, and avoid pushing beyond your comfort zone.


Remember to listen to your body and make the poses yours. Work with a qualified yoga instructor if you have concerns about your practice.

Stay tuned. I will post more yoga pose makeovers!

I recorded a brief, about a three-minute video about the SI joint.  

Enjoy!

The Deep Front Line of Anatomy

The Deep Front Line of Anatomy

Understanding your human body and how it moves can help you safely practice Yoga. Understanding myofascial pathways, specifically the deep front line of anatomy, can help you create a safe and stable yoga practice. In this musing, I explore the deep front line, its significance in yoga practice, and how to access it in yoga poses.

What is a myofascial pathway?

First, let’s discuss the concept of myofascial pathways. They are a series of connective tissue (fascia) and muscle fibers that work together to allow movement and create stability in the body. Fascia is a thin, strong layer of tissue that covers and connects muscles, bones, and organs throughout the body. Myofascial pathways help to distribute force and movement throughout the body, allowing for efficient movement while reducing the risk of injury.

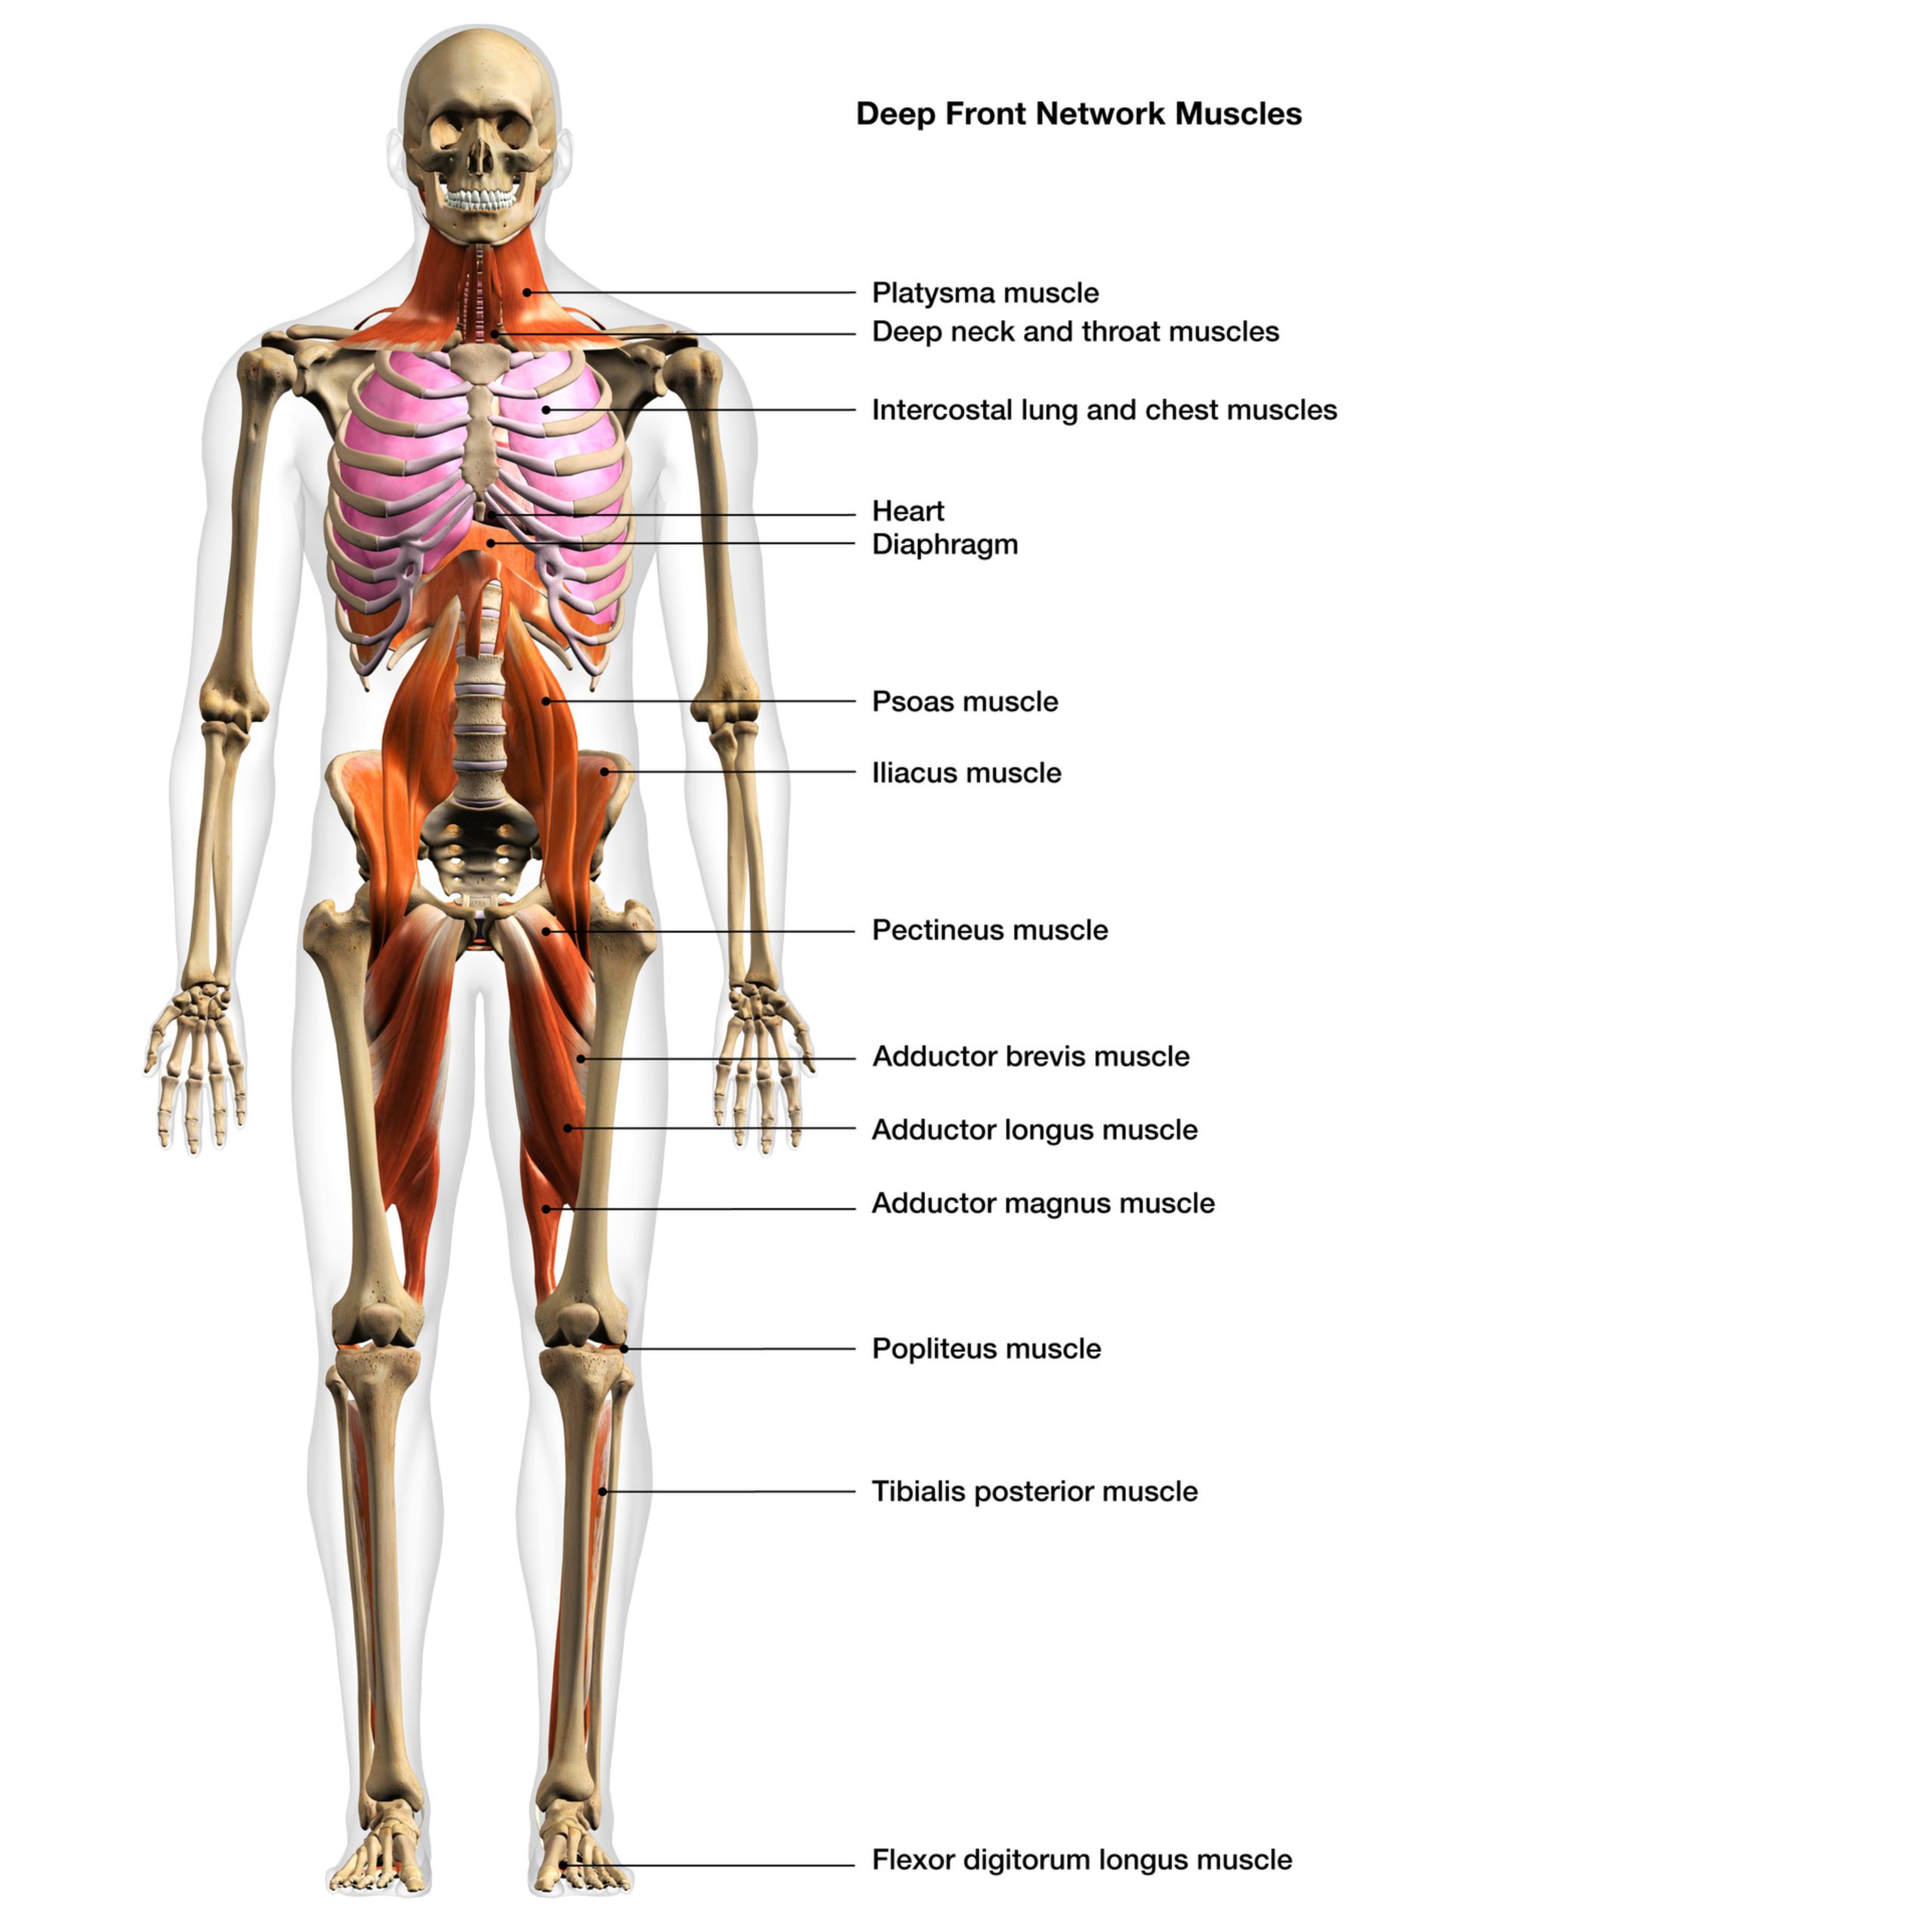
The body has several myofascial pathways, each with its own set of muscles and fascia. One example, the deep front line runs from your feet, through the inner thighs, along the spine, to the crown of your head. This pathway includes the feet, adductors, pelvic floor, psoas muscle, diaphragm, and other core muscles.

Another example is the spiral line, which runs from the feet up through the legs, hips, and torso in a spiral pattern. This pathway includes the peroneal muscles of your outer leg, outer hip muscles, internal and external obliques, and other core muscles.

Understanding and working with myofascial pathways can help you move more efficiently and reduce the risk of injury. In addition, by focusing on these pathways and the relationships between different muscles and fascia, you can develop greater strength, flexibility, and stability in your body.

The deep front line (DFL) is a myofascial pathway that runs from your feet to your head. It is a continuous chain of muscles and connective tissue that includes the plantar fascia on the soles of your feet, adductors of the inner thigh, psoas, diaphragm, and neck muscles. It ends with your tongue. 

The significance of the DFL in Yoga Practice

In Yoga, accessing the deep front line can create more stability and balance in your poses. The DFL stabilizes the spine during movement and is the true core beneath the more superficial abs.

How to Access the DFL in Yoga Poses

Next, here are some tips for accessing the DFL in your yoga practice.
Bend your knees

First, bending the knees makes it easier to engage the muscles of the feet, which are the starting point of the DFL. You activate the plantar fascia muscles by pressing down into your feet. Engagement of the feet creates a stable foundation for a pose.

Secondly, bending your knees releases tension in the psoas muscle, a significant part of the DFL. Bending your knees creates more space in the hip flexors connected to the psoas muscle. This space helps release tension and tightness in the psoas, allowing for greater mobility in the spine and hips.

Finally, bending your knees helps you engage the adductors, another link in the DFL. When you bend your knees and bring your legs closer together, you activate the adductor muscles, which run along the inside of the thigh. These muscles help stabilize the pelvis and support the spine, allowing for greater mobility and ease in standing poses.

Send your hips back

By sending your hips back, I mean not jutting your hips forward, finding a neutral pelvic tilt. This neutral hip and pelvis position happens more easily if the knees are bent or softened.

First, when you send your hips back, you create more length in the back of your legs, the hamstrings, calves, and the Achilles tendon. Lengthening these muscles and tendons releases tension and improves spine and hip mobility.

Secondly, sending your hips back can help you engage the gluteus maximus, another part of the DFL. This muscle helps stabilize the pelvis and support the spine, and engaging it can help create more stability and balance in standing poses.

Finally, sending your hips back helps you engage the psoas muscle, a significant part of the DFL. When you send your hips back, you create more space in the hip flexors connected to the psoas muscle, allowing for greater mobility and ease in the spine and hips.

Engage your adductor muscles

The adductors are a significant part of the DFL. They run along the inner thigh and connect to the pelvic floor and the psoas muscle. Engaging the adductors can help stabilize the pelvis and support the spine, creating a more stable foundation for the rest of the pose.

Secondly, engaging the adductors can help create more space in the hips, allowing more access to the DFL. When the adductors are engaged, they draw the legs closer together, creating more space in the hip joints and allowing for greater mobility in standing poses.

Thirdly, engaging the adductors helps activate the muscles of the feet and create a stable foundation for the rest of the pose. When the legs draw together, the muscles of the feet are engaged more effectively, creating a stable base for the rest of the body.

Finally, engaging the adductors can help release tension in the hip flexors connected to the psoas muscle.

Accessing the DFL in common Yoga poses

Here’s how you can access the DFL in common Yoga poses:

Downward Facing Dog

Start on hands and knees, your wrists are under your shoulders, and your knees are beneath your hips. Spread your fingers wide and press your palms into the ground. Exhale and lift your knees, starting to press your heels toward the ground as you lengthen your spine. Notice the stretch in the back of your legs up to your glutes. If you feel your spine rounding, bend the knees as much as you need to to keep the spine long and straight. As you hold the pose, imagine a line of energy running from your feet to the crown of your head, engaging the muscles of the DFL.

Crescent lunge 

Start in a knee-down lunge with your right foot forward and your left knee on the ground. Lift your spine and torso straight up as you lift your left leg from the mat. Allow the left knee to be soft or bent. Your arms may reach toward the sky or stay at your hips. Press into your right foot. Notice if you are jutting your hips forward. If they are, imagine sliding your left hip back. Engage your back leg and feel the stretch in your hip. Imagine a line of energy from your back foot, through your psoas muscle, to the top of your head.

Triangle pose  

Start with your feet wide apart on the mat, your arms extended to the sides. Turn your right foot out and your left foot in slightly. Bend your right knee, reach your right hand toward your right shin, ankle, or the floor, and reach your left hand toward the sky. Engage your legs and feel the stretch in your hamstrings and adductors. Your hand may need to rest on your thigh and keep your knee bent to maintain a straight spine. Work to keep your spine long. If you start to straighten your right leg, notice what happens to your spine. As you hold the pose, imagine a line of energy running from your right foot, through your inner thigh, and up to the crown of your head.

Accessing the deep front line of anatomy in Yoga will help you create a more stable, balanced, and easeful Yoga practice. As a result, you can release tension and experience greater ease in your physical practice. 
Below is a short, fun video with Mr. Bones leading you through a description of the Deep Front line and how to access it.